Bicep tutorial - What is Infrastructure as Code (IaC)?
Infrastructure-as-code tools, such as this Bicep tutorial, are languages that enable efficient configuration and management of computing infrastructure. With these tools, you can generalize configuration in an automatically deployable way. This enables automated, fast, and reproducible deployment of infrastructure. Moreover, this approach enforces consistency, making it especially helpful. In addition, the infrastructure code serves as a standardized way to describe resources and their configuration. The following chapters cover the basics, the toolchain, and the relationship between Azure CLI, ARM templates, and Bicep CLI.
Bicep tutorial for Azure Infrastructure as Code
This bicep tutorial introduces the proprietary IaC language in Azure for describing Azure resources. The major benefit of using bicep for azure resources is it’s vast support for all kinds of Azure resource types. It has a straightforward syntax and is much easyer to read compared to the sole json representation of the resources.
Infrastructure we want to describe
In this bicep tutorial we wan’t to build a small environment consisting of four different Resource Types, namely Blob Storages, Functions, IoT Hub and Cosmos DB and wan’t to utilize different features of those Resources.
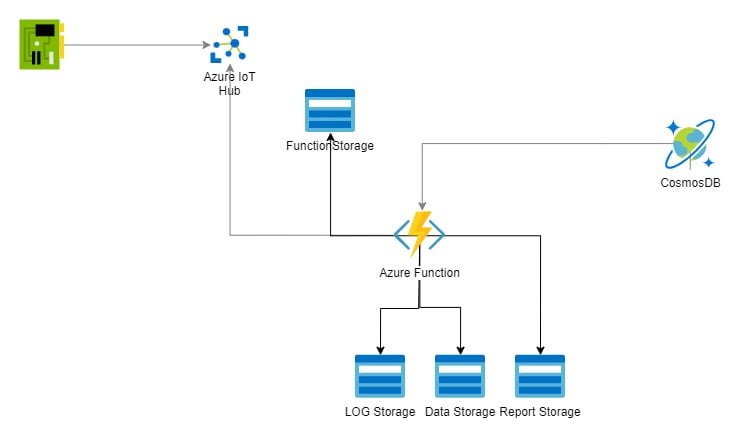
bicep tutorial: Basic infrastructure
For the Blob Storages, we want to use Queues and Blob Containers, with the Functions we are going for the Y1 Dynamic tier for automatic scaling and are creating the needed Storage Account and a ApplicationInsights Resource in the Process, for IoT Hub we chose the free F1 tier, which will come with some Restrictions, but at least allows us to create one custom endpoint, for Cosmos DB we are choosing Autoscale with shared RU per container. If some, or any of these descriptions don’t mean anything to you, never mind. Keep in mind that we chose the most cost efficient variants of the resources, so deploying the resources won’t cost much and I hope it’s sufficient to give you an insight in how bicep works and demonstrate my workflow in a comprehensible way.
I have divided the article into several parts so that it is not too long. Accordingly, this section describes the toolset, setup, and basics for an initial deployment. Separate articles, which build on each other, introduce the language for creating and configuring blog storages, functions, IoT Hub, and Cosmos DB.
Bicep tutorial - Setup IaC Toolchain
The first step of this bicep tutorial is to set up the toolchain, which fortunately is very easy. It basically only requires the Bicep CLI, which you can install using Azure CLI or as a standalone tool.
Using Azure CLI offers the additional benefit of deploying Bicep files directly to Azure.”
The core for developing infrastructure as code with bicep is the bicep cli, whose main function is the transformation of bicep files in Azure Resource Manage Templates.
To easen working with bicep we’re gonna use additional tooling.
Very useful for writing bicep infrastructure code are the extensions for Visual Studio and Visual Studio Code. I’m using the bicep extension by Microsoft for Visual Studio Code. It provides quality of live features like Syntax Highligting and Code Completion.
Bicep CLI
The bicep CLI is the core when working with bicep. It’s main feature is transforming bicep files into ARM Templates.
With Azure CLI installing bicep CLI is as easy as typing.
az bicep install
As mentioned before, azure cli is responsible for generating ARM templates (deployable resource code) out of bicep files. It is handy, to be able to inspect the generated ARM templates, but not even necessary, given that bicep can be directly deployed using azure cli. It is used like shown below.
az bicep build -f <FILE>
A very handy feature of the bicep cli is decompiling ARM templates into bicep code. If you already have an existing environment and want to create bicep code for it, it might be a good start to export the existing resources as ARM templates and decompiling them into bicep files. This doesn’t give clean, or good code, but saves work, given that than you rather have to refactor the existing code instead of writing it from scratch, also minimizing the risk of forgetting important resource settings in your infrastructure code. The decompilation can be done by using the following syntax.
az bicep decompile -f <BICEPFILE>
Deployment of bicep files
Our ultimate goal in this bicep tutorial is to deploy it to the cloud, to set up a cloud environment. With bicep it is very easy to deploy your infrastructure code to Azure.
Assuming we have a Bicep file containing code for a simple storage, as shown below, we have many different possibilities to deploy it in Azure. Specifically, we pick two of those: deployment via Azure CLI and using the Azure Portal’s ‘Deploy a Custom Template’ feature.
					@maxLength(24)
@minLength(3)
@description('Name of the storage account: 3 to 24 alphanumeric characters')
param storageName string = 'storage${uniqueString(resourceGroup().id, deployment().name)}'

@description('Type of the Stock Keeping Unit, for storages those are mostly redundancy settings')
@allowed([
  'Standard_LRS'
  'Standard_ZRS'
])
param skuType string = 'Standard_LRS'

@description('Type of the storage account')
@allowed([
  'StorageV2'
])
param storageKind string = 'StorageV2'

@description('Location for the storage resource')
param location string = resourceGroup().location

resource storageAccount 'Microsoft.Storage/storageAccounts@2022-09-01' = {
  name: storageName
  location: location
  sku: {
    name: skuType
  }
  kind: storageKind
  properties: {
    accessTier: 'Hot'
    minimumTlsVersion: 'TLS1_2'
  }
}
Bicep tutorial: Source of a simple storage
Deployment via Azure Portal
Deploying via Azure Portal is very easy; however, it only supports ARM templates. Therefore, we need to create an ARM template from our storage definition using the Bicep build command mentioned earlier, e.g., az bicep build -f storage-basic.bicep. By doing this, we generate a storage-basic.json file, which should be a valid ARM template (shown below).
					{
  "$schema": "https://schema.management.azure.com/schemas/2019-04-01/deploymentTemplate.json#",
  "contentVersion": "1.0.0.0",
  "metadata": {
    "_generator": {
      "name": "bicep",
      "version": "0.27.1.19265",
      "templateHash": "16098709155661332460"
    }
  },
  "parameters": {
    "storageName": {
      "type": "string",
      "defaultValue": "[format('storage{0}', uniqueString(resourceGroup().id, deployment().name))]",
      "minLength": 3,
      "maxLength": 24,
      "metadata": {
        "description": "Name of the storage account: 3 to 24 alphanumeric characters"
      }
    },
    "skuType": {
      "type": "string",
      "defaultValue": "Standard_LRS",
      "allowedValues": [
        "Standard_LRS",
        "Standard_ZRS"
      ],
      "metadata": {
        "description": "Type of the Stock Keeping Unit, for storages those are mostly redundancy settings"
      }
    },
    "storageKind": {
      "type": "string",
      "defaultValue": "StorageV2",
      "allowedValues": [
        "StorageV2"
      ],
      "metadata": {
        "description": "Type of the storage account"
      }
    },
    "location": {
      "type": "string",
      "defaultValue": "[resourceGroup().location]",
      "metadata": {
        "description": "Location for the storage resource"
      }
    }
  },
  "resources": [
    {
      "type": "Microsoft.Storage/storageAccounts",
      "apiVersion": "2022-09-01",
      "name": "[parameters('storageName')]",
      "location": "[parameters('location')]",
      "sku": {
        "name": "[parameters('skuType')]"
      },
      "kind": "[parameters('storageKind')]",
      "properties": {
        "accessTier": "Hot",
        "minimumTlsVersion": "TLS1_2"
      }
    }
  ]
}
Bicep tutorial: Source of a simple storage as ARM template
Bicep tutorial - Activities in Azure portal
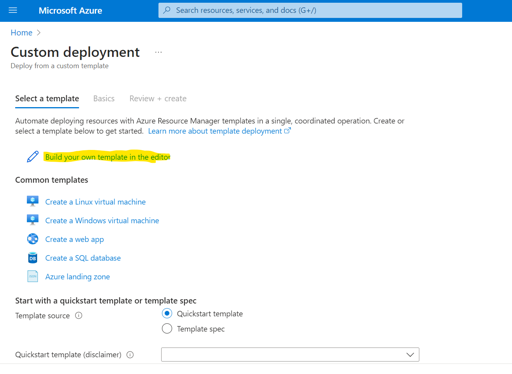
We now open the Azure Portal and navigate to ‘Deploy a custom template’. Many predefined templates can be provided here, but for the purposes of our bicep tutorial, we will opt for “Create your own template in the editor”.
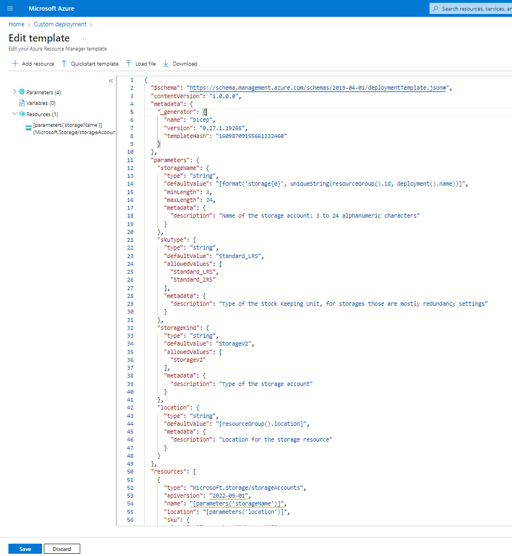
We can now copy the json from above directly into the text field, choose the storage-basic.json file, that was created earlier when we ran the bicep build command. No matter the choice, we finish by clicking save.
Bicep tutorial - Review and create
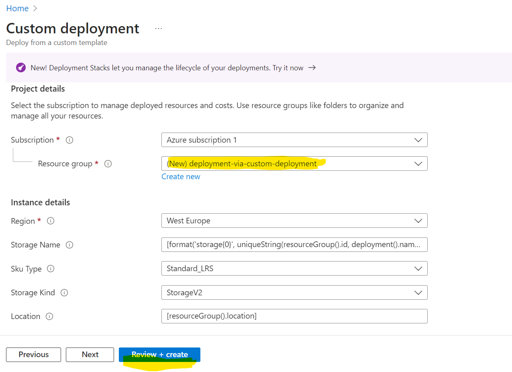
First, we have to choose a subscription and a resource group for deployment. For this tutorial, I’ve chosen to create a new resource group named deployment-via-custom-deployment.
Next, we can fill in the parameters for our Storage Resource. For example, we can name it, which is not necessary but can be helpful. I’m going to set the name property to custdeploydemo.

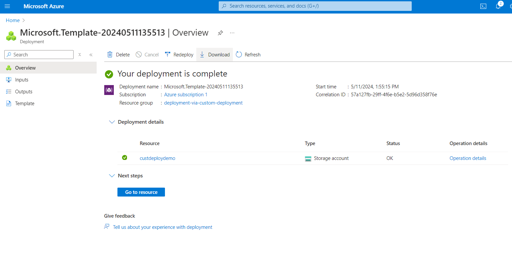
First, we click ‘Review + create,’ which starts a review of the parameters and template. Once this passes, we can deploy by clicking ‘Create.’ Afterwards, we just have to wait while the storage account deployment completes. Finally, we finish our first deployment to Azure.
Bicep tutorial - Deployment via Azure CLI
Next step in our bicep tutorial is the provisioning via Azure CLI. First you choose the appropriate target for your deployment. Options are Subscription, Tenant, Management Group and Resource Group. We are going for Resource Group similiar as in the example using the azure portal.
We now have to come up with a name, an select deployment-via-azure-cli analogous to the above example.
Next we can choose a location, we are going to choose West Europe.
Now we can create our resource group using az group create –name deployment-via-azure-cli –location “West Europe”
Last we have to give the path to our bicep file as a parameter.
All this together looks similiar like this.
					az login
az group create --name deployment-via-azure-cli --location "West Europe"
az deployment group create --name demo-deployment-via-azure-cli --resource-group deployment-via-azure-cli --template-file "C:\Tools\storage-basic.bicep" --parameters storageName=azclideploydemo
Bicep tutorial: Create a resource group
After running those commands, we get the deployment result in json form. We can see some interesting things in this, like the deployment mode being set to incremental, this would mean existing resources aren’t recreated, but simply edited, thus not destroying resources with every deployment, or the template id, with which we could find this deployment in the azure portal.
But what’s important to us, is that a Microsoft Storage with storageName “azclideploydemo”, was deployed and the provisioningstate was succeeded, so we are done with our azure cli deployment.
					{
  "id": "/subscriptions/------------/resourceGroups/deployment-via-azure-cli/providers/Microsoft.Resources/deployments/demo-deployment-via-azure-cli",
  "location": null,
  "name": "demo-deployment-via-azure-cli",
  "properties": {
    "debugSetting": null,
    "dependencies": [],
    "duration": "PT23.6643392S",
    "error": null,
    "mode": "Incremental",
    "onErrorDeployment": null,
    "outputResources": [
      {
        "id": "/subscriptions/--------------/resourceGroups/deployment-via-azure-cli/providers/Microsoft.Storage/storageAccounts/azclideploydemo",
        "resourceGroup": "deployment-via-azure-cli"
      }
    ],
    "outputs": null,
    "parameters": {
      "location": {
        "type": "String",
        "value": "westeurope"
      },
      "skuType": {
        "type": "String",
        "value": "Standard_LRS"
      },
      "storageKind": {
        "type": "String",
        "value": "StorageV2"
      },
      "storageName": {
        "type": "String",
        "value": "azclideploydemo"
      }
    },
    "parametersLink": null,
    "providers": [
      {
        "id": null,
        "namespace": "Microsoft.Storage",
        "providerAuthorizationConsentState": null,
        "registrationPolicy": null,
        "registrationState": null,
        "resourceTypes": [
          {
            "aliases": null,
            "apiProfiles": null,
            "apiVersions": null,
            "capabilities": null,
            "defaultApiVersion": null,
            "locationMappings": null,
            "locations": [
              "westeurope"
            ],
            "properties": null,
            "resourceType": "storageAccounts",
            "zoneMappings": null
          }
        ]
      }
    ],
    "provisioningState": "Succeeded",
    "templateHash": "16098709155661332460",
    "templateLink": null,
    "timestamp": "2024-05-11T12:29:09.559086+00:00",
    "validatedResources": null
  },
  "resourceGroup": "deployment-via-azure-cli",
  "tags": null,
  "type": "Microsoft.Resources/deployments"
}
Bicep tutorial: Deployment status as json
What's next in our bicep tutorial
In this introductary text we’ve talked about the uses and benefits of Infrastructure as Code for Cloud environments and specifically been advocating bicep as IaC language for azure. In the next blog, we wan’t to delve into the language itself and write our first bicep code.
>> bicep basics: storage accounts
If you don’t want to miss any of our blogs in the future, simply subscribe to our newsletter. Of course, we are also happy to receive comments or ratings so that we can get a feel for whether our articles are helpful and relevant.


